Home automation has become more popular and weather monitoring definitely falls into that category. One of the best things you can buy is a Davis (whatever version). There is a BUT though. In order to log data, you need to buy their special data-logger that will set you back some $300 or so. Or do you?
Davis Vantage Vue
This davis instrument is a all-in-one bundle. Wind direction and speed sensors, temperature and humidity sensor (nicely shielded), and a rain bucket sensor. Mind you, these are nicely set up instruments in a ready made package. In addition, you’ll get all this powered by solar power during the day, a supercapacitor charged from solar, powers it throughout the majority of the night and is backed up by a battery, should it not suffice.
All this ties to a nicely designed (straight from the early ’90s) home console, which displays all the nifty-shifty graphs and tells you various things. The console adds a couple more sensors, namely a temperature and humidity reading of the inside, as well as atmospheric pressure sensor. All this is well worth the money, go for it. It is mostly around $400-$500 (12.000 CZK 🙂 )
Software sucks, full-stop.
If you want to log data to a database, or just print them on paper and circle them with a red pen later on, don’t expect to connect to the home console via a USB, or other, reasonable interface. There has been one obscure interface in the past, but Davis “upgraded” the firmware and this is no longer available (well, it is, but ).
To recap, what you get from a Davis Vantage Vue (An impressive set, I must say):
- Temperature
- Humidity
- Wind direction
- Wind velociity (including wind gusts)
- Rain rate, total rainfall
- Solar irradiation
- Capacitance battery backup
Counting the options
The components
What will you need you ask? These:
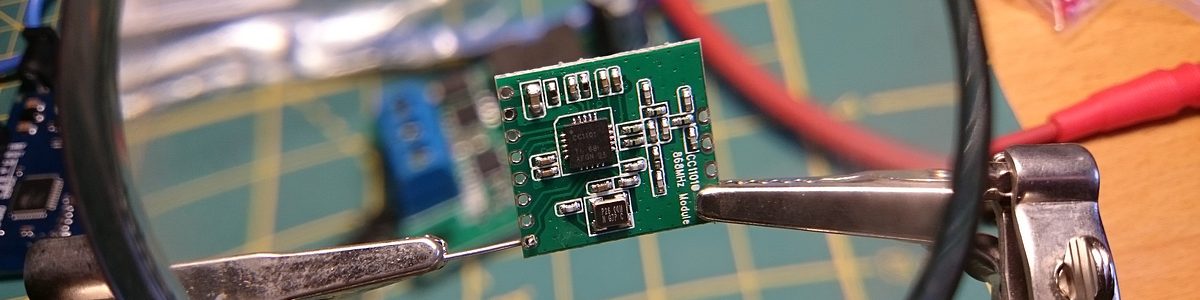
- CC1101 module
- Arduino Mini Pro @ 3.3V
- FTDI usb stick to program the arduino
- Regulated power source (3.3V)
- ESP-01s (8266 wireless chip)
Wiring together
CC1101 pinout:
The module came in without anything soldered onto it. Given the size, it eill require some steady hands a fine soldering tip.


From left to right, the connections to arduino are:
CC1101    |  Arduino
-------------------
1 – Vcc   |  3.3V
2 – GND   |  GND
3 – MISO  |  PIN11
4 – SCLK  |  PIN13
5 – MOSI  |  PIN12
6 – GDO2  |  PIN03
7 – GDO0  |  PIN02
8 – SCN   |  PIN10
When wired together, on a breadboard, the whole setup looks like this. Neat.

Software
All these need to be present in one directory / imported as libraries and then included in the main davis.ino program.
davis.ino:
#include <SoftwareSerial.h>

/*
 Davis.ino for the RFBee.
  Prints out the received data packets from the Davis Instruments Vantage Vue ISS.
  rdsman

*/
#include "Davis.h"
#include "SPI.h"
//
byte temp;
SoftwareSerial esp(8, 9);// RX, TX
String ssid ="abc";
String password="def";
String data;
String server = "abc.us"; // www.example.com
String uri = "/insert.php";

//
// The standard Arduino setup.
//
void setup()
{
 delay(100);
 Serial.begin(9600);
 delay(100);
 Radio.begin();
 Radio.rx();

//esp.begin(115200);

Serial.println("Done Setup");
}
//
// The standard Arduino loop.
//
void loop()
{
 if (Radio.available() > 0)
 printPacket();
 if (hopping)
 {
 hopping = 0;
 Radio.hop();
 Radio.rx(); // Un-comment if not using Timer 2.
 }
}
//
// Print the received packet.
//
void printPacket(void)
{
 byte header = Radio.read(); // Where's the header?
 byte package[16];

 package[0] = hopIndex; // Which frequency are we at?
 package[1] = header;
 for (int i = 2; i < 11; i++) // The received packet.
 {
 package[i] = Radio.read();
 }
 package[11] = pktRssi;
 package[12] = pktLqi;
 package[13] = freqError;
 package[14] = next;
 package[15] = pktCount;
 String data = "{hop:" + String(package[0]) + "," +
 "'header':" + String(package[1]) + "," +
 "'byte0':" + String(package[2]) + "," +
 "'byte1':" + String(package[3]) + "," +
 "'byte2':" + String(package[4]) + "," +
 "'byte3':" + String(package[5]) + "," +
 "'byte4':" + String(package[6]) + "," +
 "'byte5':" + String(package[7]) + "," +
 "'byte6':" + String(package[8]) + "," +
 "'byte7':" + String(package[9]) + "," +
 "'byte8':" + String(package[10]) + "," +
 "'byte9':" + String(package[11]) + "," +
 "'rssi':" + String(package[12]) + "," +
 "'lqi':" + String(package[13]) + "," +
 "'next':" + String(package[14]) + "," +
 "'count':" + String(package[15]) + "}";
 Serial.print(data);
 Serial.println();
 hopping = 1; // Turn on hopping.
}
Results
So far, this is in the serial console.
Done Setup
{hop:0,'header':128,'byte0':4,'byte1':171,'byte2':23,'byte3':91,'byte4':0,'byte5':189,'byte6':249,'byte7':255,'byte8':255,'byte9':184,'rssi':93,'lqi':7,'next':64,'count':1}
{hop:1,'header':48,'byte0':3,'byte1':174,'byte2':250,'byte3':65,'byte4':135,'byte5':114,'byte6':115,'byte7':255,'byte8':255,'byte9':183,'rssi':92,'lqi':7,'next':64,'count':2}
{hop:2,'header':224,'byte0':2,'byte1':174,'byte2':11,'byte3':1,'byte4':9,'byte5':213,'byte6':126,'byte7':255,'byte8':255,'byte9':184,'rssi':102,'lqi':7,'next':64,'count':3}
{hop:3,'header':80,'byte0':1,'byte1':185,'byte2':255,'byte3':115,'byte4':14,'byte5':171,'byte6':196,'byte7':255,'byte8':255,'byte9':184,'rssi':99,'lqi':7,'next':64,'count':4}
{hop:4,'header':128,'byte0':2,'byte1':203,'byte2':23,'byte3':75,'byte4':5,'byte5':122,'byte6':120,'byte7':255,'byte8':255,'byte9':183,'rssi':96,'lqi':7,'next':64,'count':5}
{hop:0,'header':144,'byte0':2,'byte1':194,'byte2':6,'byte3':81,'byte4':156,'byte5':25,'byte6':240,'byte7':255,'byte8':255,'byte9':183,'rssi':45,'lqi':1,'next':64,'count':6}
{hop:1,'header':224,'byte0':2,'byte1':186,'byte2':11,'byte3':3,'byte4':2,'byte5':211,'byte6':33,'byte7':255,'byte8':255,'byte9':184,'rssi':46,'lqi':1,'next':64,'count':7}
{hop:2,'header':80,'byte0':2,'byte1':189,'byte2':255,'byte3':115,'byte4':8,'byte5':239,'byte6':33,'byte7':255,'byte8':255,'byte9':184,'rssi':44,'lqi':1,'next':64,'count':8}
{hop:3,'header':128,'byte0':2,'byte1':200,'byte2':23,'byte3':91,'byte4':15,'byte5':67,'byte6':157,'byte7':255,'byte8':255,'byte9':183,'rssi':46,'lqi':1,'next':64,'count':9}
{hop:4,'header':160,'byte0':3,'byte1':198,'byte2':254,'byte3':41,'byte4':3,'byte5':239,'byte6':137,'byte7':255,'byte8':255,'byte9':184,'rssi':45,'lqi':1,'next':64,'count':10}
And the contents were a bit worked out and the more polished, but still a development version is at www.spoton.cz/weather
<This blog post being constantly updated>
<Web portion in a separate post>


Hi i have a davis vantage vue and i want to use this sketch for receive data and display on a lcd.
Do you have sketch that print data ?
Best regards
Well, this one prints the data, in hex format to the serial. The actual handling and translating is done by a raspberry pi. Try to check this out: https://bastart.spoton.cz/git/spoton/freedavis – if you have any questions, let me know. If you want to contribute, feel free to add, modify or enhance the original project – or do a pull request, your choice.
At least, it should be fairly easy to use the data extractions techniques from that project and put it on an LCD – enhancing the sketch.
And of course, the whole working solution, plus tons more, https://bastart.spoton.cz
Hi, is this a tutorial that explains how to build a data receiver for Davis Vantage Vue using Arduino? If it is, will I be able to transfer all that data to my computer fo example?
It sends data on a serial line. You need an FTDI to interface that serial data to USB. You can then read the data on the computer (using a serial terminal), but you would need to come up with a mechanism how to store the data, and potentially make operations on them.
Is uppose you ccould check out my project for reporting, but it requires some knowledge of the subject: https://github.com/ventillo/Plutonium
Hello, apart from ‘Done Setup’ I get no further edition. The wiring has been checked. The transceiver works perfectly on my CUL stick for my eQ-3 thermostats. A defect can thus be excluded. The ISS is about 20m away. Is the Scetch also suitable for the Vantage PRO2? At least the package should be received …
Regards Dirk
If you do only get the “Done Setup” – it can have 2 different causes. One being the inability to receive data due to obstructions / physical / whatever. The second being caused by HW causes – mostly VCC and connection differences. There might be one more – the incompatibility, as the sketch is tailored to the hopping of 5 frequencies around 868 MHz. Also the possibility of different than GFSK modulation. To be completely honest, I have not tried the vantage PRO, but it seems to come in a couple flavors.
In terms of double and cross-checking, you could just take a look at the frequencies with a SDR stick (20E), compare the sending intervals with the updates on the wireless console – that should come with the Vantage PRO.
Also, keep in mind that the Arduino version is set up as an interrupt driver receiver, so it only reads out data, if the CC1101 chip decides there is a packet.
There is one more version that I redone from the bottom -> using an esp8266 to feed the data directly into an INFLUX DB via WiFi, you can check it out -> https://github.com/ventillo/esp8266_cc1101_davis_vantage_vue_wifi_decoder – that one is not interrupt based, so you should be able to extract some kind of data.