Using the ESP8266 in it’s minimal form is a pain, especially with the built-in stock firmware and AT commands. If you want and / or need a sensible, known interface to your ESP8266, just
Few simple steps, big difference
In order to upload micropython to your ESP8266, you’ll need:
- https://github.com/espressif/esptool/ –
the obvious esp tool for flashing, written in python - micropython firmware for ESP-8266-01s – This one worked for me
- basic python knowledge to continue on with configuration, but you can just learn as you go
Start off by reading a bit of documentation, on docs.micropython.org/en/latest/esp8266/esp8266/tutorial/intro.html. It tells more or less the whole story and there is little need to deviate from that. I’ll give you a quick rundown of what worked for me.
The manual says, we should reset the flash. OK.
./esptool.py --port /dev/ttyUSB1 erase_flash
Connecting........_____.....
Detecting chip type... ESP8266
Chip is ESP8266EX
Uploading stub...
Running stub...
Stub running...
Erasing flash (this may take a while)...
Chip erase completed successfully in 2.6s
Hard resetting...
and then some other stuff I tried, just for fun
./esptool.py --port /dev/ttyUSB1 flash_id
esptool.py v2.2-dev
Connecting........_____....._____....._____....._____....._____....._____....._____....._____....._____..
Detecting chip type... ESP8266
Chip is ESP8266EX
Uploading stub...
Running stub...
Stub running...
Manufacturer: e0
Device: 4014
Detected flash size: 1MB
Hard resetting...

./esptool.py --port /dev/ttyUSB1 chip_id
esptool.py v2.2-dev
Connecting........_____.....
Detecting chip type... ESP8266
Chip is ESP8266EX
Uploading stub...
Running stub...
Stub running...
Chip ID: 0x003a6e57
Hard resetting...

./esptool.py --port /dev/ttyUSB1 read_mac
esptool.py v2.2-dev
Connecting........____
Detecting chip type... ESP8266
Chip is ESP8266EX
Uploading stub...
Running stub...
Stub running...
MAC: 60:01:94:3a:6e:57
Hard resetting...

ventil@Temelin:~/git/A___PERSONAL/esptool$ ./esptool.py --port /dev/ttyUSB1 read_flash_status
esptool.py v2.2-dev
Connecting........_____....._
Detecting chip type... ESP8266
Chip is ESP8266EX
Uploading stub...
Running stub...
Stub running...
Status value: 0x0200
Hard resetting...

./esptool.py --port /dev/ttyUSB1 read_mem 0x00000
esptool.py v2.2-dev
Connecting........_____....._____....._____....._
Detecting chip type... ESP8266
Chip is ESP8266EX
Uploading stub...
Running stub...
Stub running...
A fatal error occurred: Invalid head of packet ('F')
and the actual flashing command
./esptool.py --port /dev/ttyUSB0 --baud 115200 write_flash --flash_size=detect 0 ./esp8266-20171101-v1.9.3.bin ...
To access your new python thingie, use picocom os similar, and you should get a REPL at 115200 baud.
picocom /dev/ttyUSB1 -b 115200
Now get some simple network setup and zoom away. You’d like to import the network module and set up the basic interfaces though. There are two, STA, the standard, that connects to your network and AP, which is the access point. At this time, I’d like to disable the access point.
>>> import network                      # import module
>>> sta = network.WLAN(network.STA_IF)  # this is our standard, dhcp capable interface
>>> ap = network.WLAN(network.AP_IF)    # this is the one to be disabled
>>> ap.status()        # is it already disabled?
-1
>>> ap.ifconfig()      # if you ever want to us the AP, this is it's config
('192.168.4.1', '255.255.255.0', '192.168.4.1', '208.67.222.222')
>>> ap.active(False)   # disable it
>>> ap.active()        # Check? Check!
False
>>> ap.ifconfig()      # really disabled?
('0.0.0.0', '0.0.0.0', '0.0.0.0', '208.67.222.222')
Now with the AP interface out of the way, I’ll just connect it to my WiFi
>>> sta.status()              # No idea what 3 means
3
>>> sta.active()              # But it's active
True
>>> sta.isconnected()         # Just lacking connection and credentials
False
>>> sta.connect('Wifi ID / SSID', 'password') # Connect using these credentials
>>> sta.ifconfig()            # aaand we're connected
('192.168.0.27', '255.255.255.0', '192.168.0.1', '192.168.0.1')
Now that we have a connection, let’s do a stupidly simple test. Create a php file on a server and look at the reply. Let’s begin with the php file, let’s call it esp_post.php
<?
header('Expires: Sun, 01 Jan 2014 00:00:00 GMT');
header('Cache-Control: no-store, no-cache, must-revalidate');
header('Content-Type: application/json');
header('Accept: application/json');
header('Cache-Control: post-check=0, pre-check=0', FALSE);
header('Pragma: no-cache');

$json = file_get_contents('php://input');
$values = json_decode($json, true);
var_dump($values);
?>
You have to put this on a pulbicly available server, that can run PHP. OK, got the file on a server? What’s the server, mine is host.com 🙂
Let’s bring in the big guns in small package, the ESP post example. In the REPL, which is the ReadEvaluateProgramLoop (or something similar to that) – in other words your interactive python shell on the ESP, just type in:
>>> r = requests.post('http://host.com/esp_post.php', data = '{"this":"that"}')
>>> print(r.text)
array(1) {
 ["this"]=>
 string(4) "that"
}
The r.text line tells you what yur server actually replied. In this case, with the sucesffull variable dump. Tadaaaa. Now we can make a lot of big projects, with small effort and footprint.
A special thanks to http://dpgeorge.net/, btw…


Hi,
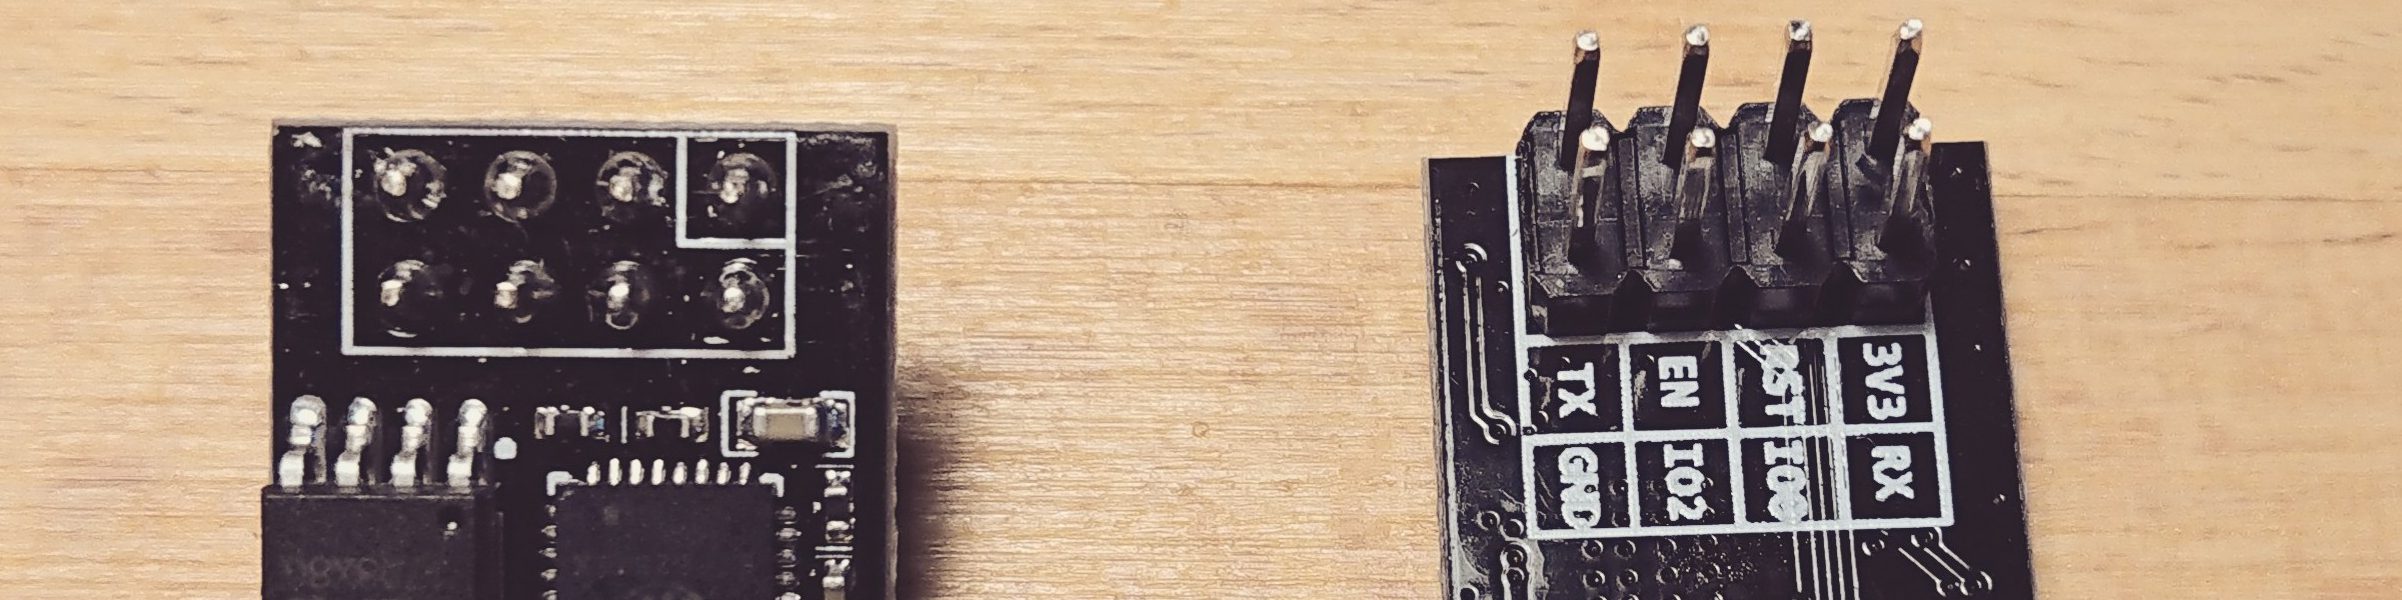
Your tutorial doesn’t show how you connected the ESP-01 to the computer to get REPL.
I’m using that common USB/UART adapter and it’s just not working for me.
Thoughts? Thanks.
Hi, not sure which part is referenced here. The hardware part: USB UART TX pin -> RX pin on the ESP-01 and RX pin on the USB UART -> TX pin on the ESP-01.
As far as any serial communications go, you need to have a sender, receiver and at least GND, if both ends are powered independently.
So you would need at least 3 wires for the ESP as well. TX from one side needs to go the RX on the other and vice versa. This is universal for all serial comms, mind you.
If you mean the sw part: picocom /dev/ttyUSB1 -b 115200.
Hope that helps.